The story of our secondhand house - part 2
When Pete and I received council approval for our removal house in July 2014, having spent the previous year and a half organising to move the house and doing the minimum required for council approval (read part 1 here), the work was only just beginning. By this stage we had finished installing new plumbing, rainwater tanks and septic system, new electrical wiring, lights and ceiling fans in every room (as required for environmental standards), insulation in the roof, three sets of external stairs and lots of cyclone strapping. The interior of the house, however, was for the most part untouched, apart from removing old fluorescent batten lights and Bakelite light switches. The kitchen was the original 1950s era design with very low benchtops and an asbestos-lined pantry; and the bathroom was a cheap 1990s DIY job. A tour of our secondhand house (BEFORE)
Replacing the roof
As soon as we had the paperwork from the council we starting looking for a roofer to replace the roof. It had passed council approval, but we knew it leaked in a few places and was best replaced before we did anything else, as installing a new roof can make a real mess in a house with VJ ceilings due to all the dust falling through. Of the two roofers in our area, one never answered his phone and the other had a 6 month waiting list, so it wasn’t a quick process. This became a recurring theme of this build – waiting for a contractor to be available, from cabinet-makers to plumbers, in a rural area with limited trades available, you just have to be prepared for things to take longer than expected.

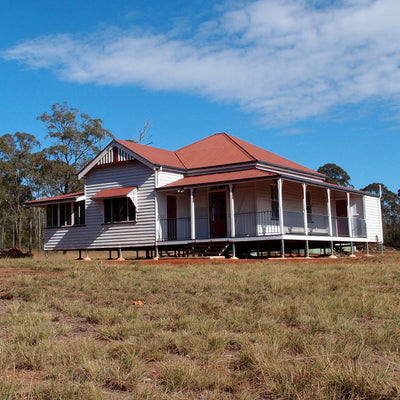
For the new roof we chose Colourbond Paperbark. We wanted a light roof colour to minimise heat in the ceiling space. We had already installed insulation under the old red roof, and were well aware of how hot the ceiling space was, so we were able to notice the difference up there as soon as the new roof was finished. If you’re in a hot climate, I recommend looking for a light roof colour and using plenty of insulation.
Starting to paint
With the roof finished, we moved on to painting the first bedroom. Painting a Queenslander with VJ walls and ceilings is very different to a modern house with gyprock walls. Ninety percent of the time is spent sanding, cleaning and gap-filling, the actual painting process is relatively fast, although we found that brushes were more effective than rollers. This being a farmhouse, we chose a beige colour (Dulux Tapestry Beige) to minimise dirty handprints showing up on the walls. We also sanded and painted the ceilings as they had not been done for about 50 years and we thought one good coat now should last another 50 years. Its amazing how crisp white ceilings can refresh a room. (I wish I read this post with tips for painting a room without making a mess before we started!)
The top layer of paint that we removed was relatively new (probably 5-10 years old), but the older layers were almost certainly lead paint (possible also arsenic in the blue colours), based on the age of the house, so we wore full protective clothing while sanding – dust masks, goggles, welding hoods, overalls and gloves. We used a variety of electric sanders and I had the job of hand-sanding the grooves between the VJ boards while Peter sanded the ceilings.
We alternated painting (hard work) with demolition of the kitchen, bathroom and laundry (fun work). While we tried to keep as much of the old house as possible, we did seem to take countless loads to the local dump, even so, I like to think it was less waste than if we had built the house from scratch. We also decided to remove the asbestos sheeting from the built-in veranda and pantry. Again, we wore all the protective clothing and disposed of the asbestos as per the instructions from our local council. I really hate the look of asbestos, so it’s nice to have it out of the house and know that we never have to worry about accidentally releasing asbestos dust. We replaced those panels with an MDF product called Easy VJ, which was true to its name, very easy to use and looks like VJ until you get up close to it. Much better than asbestos sheeting anyway.
We also managed to spend a few weeks painting the outside of the house with the help of my parents. After much deliberation and a large wad of colour charts, we decided to paint the outside of house the same beige colour as the inside, with Colourbond Jaspar and Dulux Limed White Half as the trims. The colour choice was restricted by us wanting to use a light colour, both for to reduce solar gain and because light pigments last longer, but having red clay soil which would easily stain the house if the colour was too light. The Tapestry Beige seemed the perfect match, or at least it was silly to pick something similar but different, so we went with exactly the same colour. (How to chose exterior paint colours)
Gradually we were able to start rebuilding the rooms that we had demolished. We were also surprised to find several companies in Brisbane that sell Queenslander features, and we were able to replace the freeze above one bedroom door with an exact match to the others in the house, and chose a new decorative gable for the front of the house. I was also able to order new sash lifts and locks for the windows, it seems pretty easy to find most old features without visiting a demolition yard (we don’t have one locally, otherwise I would happily go to one).
While we were keen to do as much of the building work as possible, we realised that it was just going to take too long if we tried to do everything, so we decided to engage a builder to construct a large workshop shed on the property. We decided on a large 12m by 15m by 4.3m shed so that we could be able to use it as storage and a workshop. One third of the shed has a mezzanine floor with shelving for storage above and a room built underneath to keep things that need to stay clean (such as beekeeping equipment). The rest of the shed is set up with Peter’s tools such as drill press, band saw etc, which we have never had space to set up properly.
A new bathroom
We were very happy with this builder, so we asked him to also install the new bathroom. It’s difficult here in a rural area to find a builder to project manage an entire build, so I still had to engage the other trades, but at least they all know each other and can work together easily. It does mean extra work to project manage the build yourself and it is particularly difficult if you are not living at the house. If you don’t visit each day you can miss key design decisions. Fortunately our builder had very good taste and built everything as I would have chosen if I had been there, and I did try to get to the house as often as I could and at key times to make sure everything was going to plan. (How I designed our bathroom)
The old bathroom had a separate toilet and an odd long thin bathroom, it was a terrible use of the space, so we removed the dividing wall to open up a large bathroom. We then debated the pros and cons of a separate toilet and eventually agreed to put a second toilet in the laundry instead. We did move the toilet into a different corner of the room (instead of being visible from the veranda) and used a tiled internal divider wall to separate it from the rest of the room. The advantage of having a raised Queenslander house with plumbing underneath is that it’s very easy to move plumbing around to suit new layouts, and the new tiled floor was able to hide all the old holes in the floor. Online design software was invaluable in trying out different arrangements to optimise the space.
New hardwood floors
In April 2015 the bathroom installation work was finished, which left us with painting the new walls and ceiling (this time with a roller, so much quicker than the VJs in the rest of the house). Around this time we also decided on flooring for the rest of the house. The original floor coverings in house was lino in most rooms and an awful red carpet in the lounge and master bedroom, which we had removed during a demolition phase, revealing hoop pine floors beneath. We had considered tiling the entire house, however this is not recommended for Queenslanders as they do tend to move around a bit on their stumps. Then we thought about polishing the hoop pine, but as a soft wood, it’s not suited to being exposed and several rooms had visible gaps between floorboards.
We found a company in Brisbane that lays real hardwood boards over original floors, and they were willing to travel to Kumbia to install at our house. After the boards are laid they can be finished with either a two pack coating or a penetrating wax product. We settled on ironbark (the hardest timber you can get, milled near us at Gympie) and the penetrating wax finish. The advantage of the wax finish is that it can be touched up in small areas and is very low VOC, although it was the more expensive option. The new floor has both physically stabilised the house and provided a thicker barrier to reduce drafts, as well as heat loss and gain through the floor.
Having ordered the floors it was a race to get the walls and ceilings painted in the unfinished rooms, skirting boards removed and hundred-year-old doors trimmed, so that the floor could be installed. We then installed and painted new skirting boards before the floors were polished with the penetrating wax.
A new kitchen
When the floors were done (October 2016) we were able to see a cabinet maker about the kitchen and laundry cupboards. For this house we wanted plenty of storage space so that we could have most of our clutter hidden away. We had already had the builder install new shorter kitchen windows that would better accommodate a bench underneath, and the old pantry space had been re-sheeted, ready to house the oven (as it would have done originally when the kitchen was added to the house in the 1950s). We couldn’t decide whether to install a dishwasher, having never lived in a house with a dishwasher before. We know that they are important for resale value, and we were tempted to try one, so included a single dishdrawer in the final design, which has proven to be plenty for two people. (How I designed our kitchen)
Our cabinet maker was very busy, and could not install the kitchen until January 2017. We chose a wood benchtop (Tasmanian Oak) and two-pack paint finish on the doors in a lighter shade of the wall colour (Dulux Limed White Half), as the kitchen is quite dark on the western side of the house. It is our aim to have this last many years, we are not keen on remodelling anything for a long time, so we tried to choose quality fittings. There was not quite enough space for a table in the room and no obvious place for a dining room as such, so we made the island bench into a bar with stools to seat four people, and will eat there most of the time, with a larger table either outside or in the built-in veranda if we have guests.
In the laundry we used the same tiles as the bathroom and had cupboards built from cheaper laminate as this will not be such a high-use room. We removed the old shower and had a toilet installed instead. There is access to the laundry from the veranda, so this will be a messy space to leave dirty farm clothes before coming into the house.
We chose a new woodstove (Selecting a woodstove for our new house), as the old one had been removed for council approval (we couldn’t prove that it had been installed correctly). In the past we have had woodstoves with cooking ovens, but this had been of most use to us when the alternative was a dodgy old electric oven. Lately we had only been using the top to heat water and cook casseroles, and with a nice new electric oven installed in the new kitchen, we decided to get a small woodstove that could also be used for stovetop cooking. With a new hearth made out of leftover tiles, it fits back in where the old woodstove was removed. Having 100 acres of eucalypt bush on the property, it makes sense to heat the house with wood, and Queenslanders are notoriously draughty (good ventilation in summer, very cold in winter!).
In April 2017, we have finally moved in after owning the property for five years, and working on the house for nearly four years. Of course, its not quite finished! We have some painting left to do outside, including doing something about the veranda floorboards, we haven’t installed our solar PV or hotwater system yet, and we haven’t done any landscaping around the house, however those jobs will all be more achievable when we live in the house rather than just visiting at weekends. (We moved house!)
Although the build has taken us a long time, we have been able to do as much as possible ourselves, keeping the costs down and also spreading the costs over a longer period so that we didn’t need a loan. We’ve had time to design each area of the house as we were ready, rather than doing it all at once at the start. Using a secondhand removal house meant that we had less waste and better quality materials than a new build of similar value. I also know every inch of the house intimately, having sanded, washed and painted all of it. Of course there have been compromises along the way, but for the most part, everything is exactly how we want it
Lessons learnt
- Its difficult to get trades in rural areas, be patient and do as much as you can yourself
- When you find a good builder, give them as much work as possible to keep them coming back!
- Install a light coloured roof to reduce solar gain
- You never know what you will find when you start pulling apart an old house
- Old Queenslander features can be replaced with new versions to match the house
- Painting VJ boards takes longer than you think, but it’s worth doing all the preparation work to get a nice longlasting finish with the final coal of paint
- If you have more time, it’s easier to paint and then install the ceiling fans, they are a real pain to tape up before painting!
- If not living at the site, try to get there regularly to check on contractors, even if they have a detailed brief, it good to check that everything looks the way you had imagined.
- Take photos of things that are to be covered up – the inside of walls, open trenches – you never know what you might need to find again in future.
- Be prepared to clean up after your trades, you don’t really want to pay for them to clean up, this is one thing you can do to save some money, take all the building rubbish to the dump regularly, to keep the site tidy for the workers.
A secondhand house for Cheslen Rise
A tour of our secondhand house (BEFORE)
The story of our secondhand house - Part 1
Choosing insulation for our house
Renovating a Queenslander house
Building the Queenslander house - book review
Stairs for our secondhand house
Removing asbestos from our secondhand house
Another update on our house progress
How to choose exterior paint colours
And one more update on our house progress
Keeping our house warm in winter
1 comment
Share this
Recent Posts


eBooks By Eight Acres
View all


Related Posts
-

Posts about Growing Vegetables on Eight Acres
I started my first vegetable garden in 2008 after I was inspired by a DVD in which Peter Cundall (from Gardening Aust...
-
Hatching chicks - incubator vs mama hen
Over the years I've hatched hundreds of chicks using an electric incubator, but I never used a clucky hen to hatch ch...
-
We put solar panels on our shed roof
We have been talking about getting solar for about 10 years and last week our electrician came to set up our new syst...
-
Ten renovation projects you can start while in quarantine
Chances are, you’ve recently had to grapple with the reality of quarantine, or at least spending more time at home, a...
-

Pandemic prepping for non-preppers
In case you hadn't noticed... we are now dealing with a global pandemic of COVID-19. As countries are gradually closi...
-

Using electric fence chicken netting (and chicken tractors)
We recently started using electric fence netting with our chicken tractors and we are very happy with the results. In...


That would have taken ages to write! It was great to read all the final details though. Any kind of project, even the small ones, end up being more involved than we initially plan for. Still, it’s nice to see them finally finished in the end.
It would have taken you longer, so I understand why they were left out. But it would be nice to see some photos of the things you were explaining. Not LOTS of photos. Just a few. I’ve enjoyed following your remodelling journey over the years. :)
Leave a comment