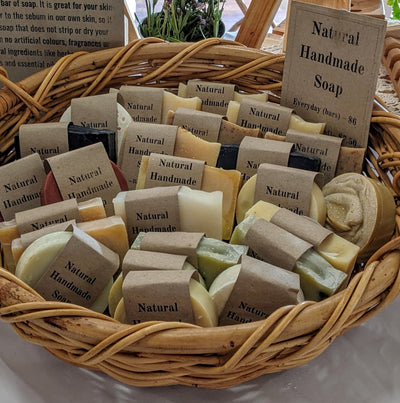
How to make coconut yoghurt

The brand I can get here is $3 for 200 mL containers. I was making yoghurt from powdered milk for about 50c/L. So I was thinking there must be a way to make coconut yoghurt, but I didn't feel like mucking around and wasting heaps of coconut milk trying to get it right.... and then Biome Eco Store sent me a Mad Millie Coconut Yoghurt Kit to try. The kit is a 1L jar, starter culture, thickener, thermometer and instructions. If you don't need the full kit you can actually buy the Mad Millie Coconut Yoghurt Thickener, the Mad Millie Coconut Yoghurt Culture and the Mad Millie Coconut Yoghurt Jar separately (the yoghurt culture for coconut yoghurt is the same one used for dairy yoghurt). (Did I tell you about Biome Eco Store? I love their products!)


I have to say that making coconut yoghurt is not as easy as making dairy yoghurt, but its better than paying full price for someone else to make it! Its more complicated because you have to add a thickener as it has different proteins to dairy milk and doesn't naturally thicken. To make coconut yoghurt you need four ingredients:
- Coconut milk or coconut cream. The Mad Millie recipe specifies the fat content at 17g/mL. which makes it coconut cream in the brand I buy. This helps to thicken the finished product.
- Thickener. You can use all sorts of different thickeners. I found recipes using starch thickeners (tapioca, cornflour, arrowroot), gelatin, agar, pectic and coconut meal. The Mad Millie thickener supplied with the kit is based on tapioca, maltodextrin and guar gum. The advantage of tapioca is that it can thicken at lower temperatures than the other options.
- Sugar - coconut milk is very low in sugar, which is needed to feed the bacteria, so you need to top up with a small amount of honey, maple syrup, coconut sugar, raw sugar or similar.
- Yoghurt culture - either a commercial powdered yoghurt culture, a spoonful of coconut yoghurt or a capsule of probiotics. You are looking for a few of the following: L Bulgaricus, S Thermophilus, L Casei, L Acidophilus, B Bifidum, B Lactus...
The Mad Millie kit includes the thickener and the culture. You need to provide the coconut milk/cream and the sugar. I can get $1.70 for 400 mL, so this works out way cheaper than the commercial coconut yoghurt options.
The instructions with the kit are very comprehensive. Basically you want to sterilise your jar, heat your coconut milk to incorporate the thickener and starter, then pour it all into the jar and keep it warm somehow. Personally I'm a big fan of the Easiyo thermos, which I use for just about everything except making Easiyo products. I was given one and I found another one at the dump shop for $2. I regularly see them in op shops. They are a cheap and easy way to keep yoghurt and cream cheese warm, especially in winter when our kitchens are too cold for these products. You just add hot water, or boiling water, depending on the temperature of your starting mixture. The Mad Millie Jar fits in the Easiyo thermos, so I don't have to use the plastic jars that came with it. Alternatives include: wrapping in blankets, putting it in an eski, using a slow cooker, putting it in a prewarmed oven with the pilot light on and leaving it by the fire.
 |
| heating the coconut milk |
 |
| adding the thickener and some honey and vanilla |
 |
| the jar ready to go |
While I did make one batch following the instructions, I wasn't really happy with the process. I don't like 1) waiting for milk to heat up or 2) having to wash a pot that had milk and thickener in it. I read a few blogs and came to the suggestion of starting at room temperature. This sounded like my kind of method! So for my second batch I just opened the can of coconut cream and poured it into the clean jar. I added the thickener, honey and culture, shook it up and put it in the Easiyo thermos with boiling water. After 12 hours I put it in the fridge and a few hours later is was thick tasty coconut yoghurt. Much easier and no pot to wash up! There doesn't seem to be any need to heat the milk because the coconut cream fresh from the can is already sterile and the tapioca starch works at low temperature. The key is to make sure that the yoghurt ferments at 46degC (hence the boiling water in the thermos).

Overall, coconut yoghurt can be easy to make, cheaper than buying it and its very tasty, whether or not you currently eat dairy.
Do you eat coconut yoghurt? Have you tried making it?
More post about yoghurt on Eight Acres
| How to make coconut yoghurt | |
| How to make Easiyo yoghurt | |
| How to make yoghurt from powdered milk | |
| How to make yoghurt from raw milk | |
|
The full range of Mad Millie Products at Biome Eco Store can be found here, including kits for cheese, yoghurt and vegetable fermenting.
** This post contains affiliate links for Biome Eco Store products. They sent me a coconut yoghurt kit to try, which I have described in detail in this post and showed you my successful coconut yoghurt made using this kit. Thank you for supporting my blog by using my affiliate links.**
Share this
Recent Posts


eBooks By Eight Acres
View all


Related Posts
-
How to join electric fence polywire
When Pete’s dad bought our first electric fence energiser secondhand from a garage sale, it came with a roll of elect...
-

Plastic Free July - ten years of tips and information!
Have you signed up for Plastic Free July? The idea of Plastic Free July is to try for a month to actively avoid ...
-

Removal house advice - where to start?
A removal house is a great way to quickly put a house up on a bare block of land. For us it bypassed all the decision...
-

Making our bee boxes last longer - without copper napthalate
In Australia, bee boxes are usually made from hoop pine, which is an inexpensive soft wood. The only problem is that ...
-

Butchering Poultry
Last weekend we got up early and prepared for a morning of killing poultry, not my ideal Saturday morning, but the ti...
-
What is candied honey?
Our latest batch of honey has gone completely solid! I opened the tap on the bucket and nothing came out. Honey has...


Leave a comment