Composting can be simple!
As I've mentioned previously, I used to think that making compost was impossible, but I tried again anyway, and so far I've had no trouble. Recently I've been using lots of compost, so I want to encourage you to use your greenwaste productively too, and not just throw it away. Here's a great overview to get you started. I want to tell you what I do, as I don't follow all the instructions exactly, I just make it up and it still works, so don't be daunted by all the complicated instructions, just have a go!
They recommend using a bin, which is what I use too, I haven't tried the open pile method, but I can imagine what the dogs would do (eat/roll in it) so I think the bin is a better option! The chickens also take a great interest in the compost whenever I open the hatches at the bottom, so I think they would destroy a pile very quickly! The video suggests to put the bin in contact with the soil, near to the house (for convenience) and I would add that it needs to be in a position where it will get some sun over winter to keep everything warm enough to keep working. To start the compost, first use a layer of dead leaves (I think you could also use scrunched up newspaper if you had nothing else) for aeration, a bucket of soil to inoculate the compost with some soil bacteria (you could also use a bucket of compost) and then start adding your kitchen scraps. I put everything vege or fruit in the bin, no big bits of meat, as it attracts mice, although if there's a scrap of meat in with the rest, I just chuck it all in. Best to mix in some green weeds and some brown dead material as well, to create a nice variety of nutrients (the microbes need a ratio of carbon to nitrogen of 30:1, green stuff has more N than brown stuff, doesn't have to be too technical though), plenty of aeration and so it doesn't get too sloppy. The video says to mix it up regularly using a garden tool, but I don't really bother, sometimes I'll use a fork to turn it over, but probably not as often as I should (that's the advantage of those bins that flip over, although beware of the ones that flip longways, its all good until they get too full, and then you can't flip them because they're so heavy!).
They also say to use two bins, so you have one that you're adding scraps to, while the other one is maturing and the compost is being removed. That is necessary if you have a closed bin system, but I can scoop out the compost from the bottom hatches of my bin (and in the past when we just used a drum, I tipped in over a bit and scraped out some compost from the bottom of the bin), so you can manage with one bin, if you don't mind making a mess. They also put a sack over the top of the scraps, but I just use the bin lid and haven't had any problems as the bin is usually full to the brim!
I hope this shows you that its really not that hard to make compost, the main thing is to keep adding lots of different material, not just kitchen scraps. Don't stress about putting in weeds, even if they have seeds, I figure they sprout up everywhere whether they're in the compost or not, so who cares, its all good green matter for the compost! If you have access to manure and/or comfrey, these are considered compost activators that add lots of nutrients and/or microbes to get your compost working. You can buy premixed compost activator too, but I'd rather grow comfrey than pay for it!
Once the compost at the bottom of the bin is a lovely dark colour, I start scooping it out to use whenever I plant out seedlings, to spread around the garden if the beds are looking a bit low, or to bulk out seedraising mix. Anywhere that I put compost I always have several tomatoes sprout! Its great! I find that things like corn cobs, egg shells and mango seeds take longer to break down, but I just bury the chunks in with everything else, they will decompose eventually, and in the meantime they help to aerate the soil.
If you don't have space or enough scraps for a full compost, there are other options so that your scraps are not totally wasted. You can use bokashi bin, which is really just a nice bucket with a false floor and a tap at the bottom. You need to add "enhanced microbial bokashi" which apparently is a mixture of sawdust and bran infused with good bacteria. I stopped using our second-hand bokashi bin after we got the compost bin and because I didn't want to have to keep buying that mixture, however, now I wonder if its just lacto bacteria and if whey would do the same thing?? Especially as the compost is said to be "pickled". Anyway, you can drain juice from the bucket, and when its full you just bury the contents. I had a friend who dumped the contents into pots, mixed with potting mix, left for a few weeks and then used it to grow veges. It was a great system for a renter, or if you have limited space.
The other idea for small spaces is a worm farm. These come in different sizes, we are planning to build one using a wheelie bin, but you can use much smaller containers, either buy a system or build one from a stack of polystyrene (or other plastic) boxes. I'm no expert on worm farms yet, but again you get some liquid to feed your plants, and compost after the worms have been working on it for a while, and your vege scraps don't have to go to landfill :)
Do you make your own compost? Any advice?
Read about my latest worm farming adventures here.
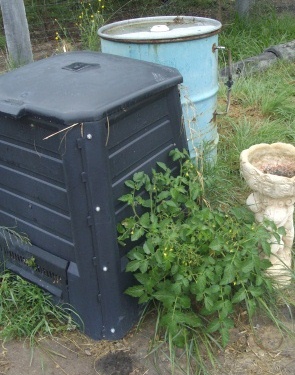 |
| my compost bin + tomato plant |
They also say to use two bins, so you have one that you're adding scraps to, while the other one is maturing and the compost is being removed. That is necessary if you have a closed bin system, but I can scoop out the compost from the bottom hatches of my bin (and in the past when we just used a drum, I tipped in over a bit and scraped out some compost from the bottom of the bin), so you can manage with one bin, if you don't mind making a mess. They also put a sack over the top of the scraps, but I just use the bin lid and haven't had any problems as the bin is usually full to the brim!
I hope this shows you that its really not that hard to make compost, the main thing is to keep adding lots of different material, not just kitchen scraps. Don't stress about putting in weeds, even if they have seeds, I figure they sprout up everywhere whether they're in the compost or not, so who cares, its all good green matter for the compost! If you have access to manure and/or comfrey, these are considered compost activators that add lots of nutrients and/or microbes to get your compost working. You can buy premixed compost activator too, but I'd rather grow comfrey than pay for it!
Once the compost at the bottom of the bin is a lovely dark colour, I start scooping it out to use whenever I plant out seedlings, to spread around the garden if the beds are looking a bit low, or to bulk out seedraising mix. Anywhere that I put compost I always have several tomatoes sprout! Its great! I find that things like corn cobs, egg shells and mango seeds take longer to break down, but I just bury the chunks in with everything else, they will decompose eventually, and in the meantime they help to aerate the soil.
If you don't have space or enough scraps for a full compost, there are other options so that your scraps are not totally wasted. You can use bokashi bin, which is really just a nice bucket with a false floor and a tap at the bottom. You need to add "enhanced microbial bokashi" which apparently is a mixture of sawdust and bran infused with good bacteria. I stopped using our second-hand bokashi bin after we got the compost bin and because I didn't want to have to keep buying that mixture, however, now I wonder if its just lacto bacteria and if whey would do the same thing?? Especially as the compost is said to be "pickled". Anyway, you can drain juice from the bucket, and when its full you just bury the contents. I had a friend who dumped the contents into pots, mixed with potting mix, left for a few weeks and then used it to grow veges. It was a great system for a renter, or if you have limited space.
The other idea for small spaces is a worm farm. These come in different sizes, we are planning to build one using a wheelie bin, but you can use much smaller containers, either buy a system or build one from a stack of polystyrene (or other plastic) boxes. I'm no expert on worm farms yet, but again you get some liquid to feed your plants, and compost after the worms have been working on it for a while, and your vege scraps don't have to go to landfill :)
Do you make your own compost? Any advice?
Read about my latest worm farming adventures here.
Share this
Recent Posts


eBooks By Eight Acres
View all


Related Posts
-

Why do chickens stop laying eggs in winter?
Chickens naturally stop laying eggs in winter. Actually when you think about it, the fact that they lay an egg a day...
-

Weird vegetables in my sub-tropical garden
I've had some questions about the weird vegetables in my sub-tropical food garden, so here are some details for you. ...
-

A winter linen shawl
Each year as the weather cools, I get the urge to pick up my knitting needles and crochet hook again. I usually rumma...
-

Using electric fence chicken netting (and chicken tractors)
We recently started using electric fence netting with our chicken tractors and we are very happy with the results. In...
-

Developing our food forest
What is a food forest? A food forest is a permaculture concept, best explained by the following quote from My Smart G...


Leave a comment